

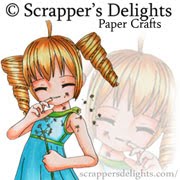


This months Special Deal image was what I chose for my DT project this month. As a DT of Scrappers Delights I needed to do either a tutorial, video or tips and tricks. I have never created a video before so I decided to do a step by step of a non-objective color (which is a style within the category of abstract art) picture.
I decided to do my step by step utilizing a technique taught in my Copic Marker Tutorial class. When I did this class we used a portrait type image and the Scrappers Delights image I picked seemed to be a good image to try out this technique on.
Image is Honey Sweet Heart
So lets get started....there are lots of pictures to follow so you may want to grab a cup of coffee while we take this picture step by step.
Picture is printed out into a rectangle measuring 3x5.
The first steps I make in coloring the image is to lay down all my base colors before I add the detail.
My first step is to color the skin with E51.


Next I color the left half of the image with B01 and the iris'


the hair with E42


I lay down a base color to the background with B21


Lets start on adding shadows to the skin.
Lay a layer of R11 to the lips and contours to the face.


adding shawdows to the blue side of the face with C2 and the whites of the eyes

and darker shadows with C5 adding this color also to the right side of the face around the eye


adding a bit more shadow with BV11.
these colors are starting to get a bit scary!


R02 around the eye on left and right eye and along contour of the face.

E13 to the iris, left side of nose, under lip and darken around the eyes. i also add a bit to the hairline and right corner of the mouth.

Very hard to see but i now went in with E30 to form the cheeks and chin, eye socket and forehead. Also the right hand side of the nose. I than give a glaze cover of E51 to the entire face.

I jump over to blue side of hair and background. Starting at the top left corner I add B97 and come down with feather strokes about 1/4 of the way......blending that out with B14 and than blending it out a bit further with B21 which brings us down to about the middle of the page. Than starting at the bottom left corner I feather B97 first and blend that out with B34 and again with B21 to meet my center of the picture. I continue with the same colors to finish the background (as you will see in the next photo.
Since I have my blues out I add highlights to the blue side of the hair and clip in her hair.


And here she is finished......

Now that the image is completely colored...it is time to create a card....
Complete list of colors used.
B 97, 34, 24, 23, 21, 14, 12, 000, 0000
E 51, 43, 42, 34, 30, 27, 13, 08, 04, 00
R 89, 85, 83, 81, 37, 35, 32, 22, 12, 11, 02
C 5, 4, 2
W 5
BV 11
YR 14, 31, 24
G 24, 21
Y 11, 18, 24
V 09, 06, 04
RV 14
Here are some important links for you.
This was a great tutorial Jane, I absolutely love this one. By the way, I am your newest follower! xxx
ReplyDelete